Duration 8h 23m Project Files Included MP4
Title: Blender 101 – Blender 221: Hard Surface Modeling
Info:
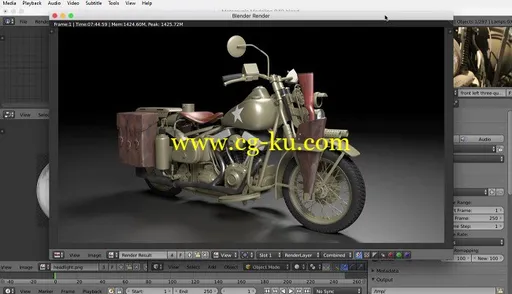
This is a project-based course where we will create Captain America’s motorcycle from the 2011 movie, “Captain America: The First Avenger.” I have taken photographs of the motorcycle at the Harley-Davidson Museum for use as our reference images. You will not only be introduced to new modeling tools, but you will be shown the techniques and strategies needed to tackle a larger modeling project such as this. In the end we will add materials and textures, as well as light and render the iconic motorcycle.
01. Reference Images
02. Starting the Frame
03. Continuing the Frame
04. Assembling the Frame
05. Finishing the Frame
06. Building the Rear Brace
07. Starting the Tires
08. Modeling the Front Fender
09. Creating the Rear Fender
10. Modeling the Gas Tank
11. Creating the Seat
12. Building the Front Fork
13. Using Paths for the Handle Bars
14. Modeling the Rear Cannisters
15. Creating the Flame Thrower
16. Modeling the Rear Lights
17. Building the Rear Rack
18. Using Booleans to Finish the Rack
19. Beginning the Engine
20. Circular Extrusions from Square Polygons
21. Continuing the Engine
22. Modeling the Engine Heads
23. Creating Tubes with Paths
24. Adding Details to the Engine
25. Modeling the Rocker Covers
26. Using Groups in Blender
27. Modeling the Exhaust Pipes
28. Finishing the Exhaust Pipes
29. Building out the Engine
30. Using the Bevel Tool
31. Building Complex Shapes
32. The Solidify Modifier and Booleans
33. Adding Details to the Left Side
34. Connecting Objects with the Path Tool
35. Beginning the Transmission Cover
36. Continuing the Transmission
37. Using Booleans to Finish the Transmission
38. Adding Detail with Paths and Solidify
39. Adding Geometry to Paths
40. More Tubes with Paths
41. Modeling the Headlight
42. Creating Coils and Springs
43. Using the Array Modifier for Spokes
44. Creating Tire Treads
45. Sculpting the Leather Saddlebag
46. Creating Base Materials
47. Adding Multiple Materials per Object
48. UV Mapping
49. Adding Image Textures
50. Finishing the Textures
持续时间 8h 23m 项目文件包括
标题: 搅拌器-搅拌机: 硬曲面造型
信息:
这是一个 project-based 的路线, 我们将创建美国船长的摩托车从2011电影, "美国船长: 第一复仇者"。我在哈雷-戴维森博物馆拍摄了摩托车的照片, 用作参考图片。您不仅将引入新的建模工具, 而且还将显示解决大型建模项目所需的技术和策略。最后, 我们将添加材料和纹理, 以及光线和渲染的标志性摩托车。
参考图像
开始框架
继续框架
装配框架
完成框架
建设后方大括号
开始轮胎
前挡板建模
创建后方挡泥板
燃气罐的建模
创建座位
建设前叉
使用手柄条的路径
后罐建模
15. 创造火焰投掷
后灯建模
17. 建造后架
使用布尔值完成机架
开始引擎
正方形多边形的圆形挤压件
继续发动机
发动机头部的造型
用路径创建管
向引擎添加详细信息
摇臂罩造型
在搅拌器中使用组
排气管的建模
涂装排气管
建立发动机
30. 使用斜角工具
生成复杂形状
固化修饰符和布尔值
向左侧添加详细信息
用 path 工具连接对象
35. 开始传输盖子
继续传输
使用布尔值完成传输
添加路径和实体的细节
将几何图形添加到路径
多径管
车灯造型
42. 创建线圈和弹簧
对辐条使用阵列修饰符
创造轮胎踏面
雕刻皮革 saddlebag
创建基材
每个对象添加多个材料
48. uv 贴图
添加图像纹理
完成纹理