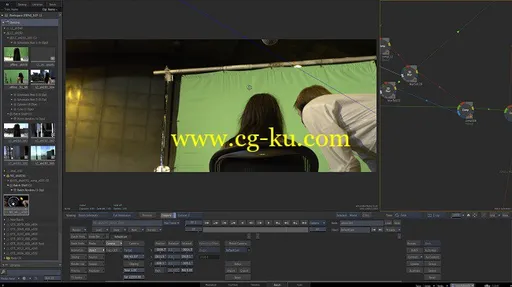
12 Classes Project Files Included MP4
Title: FXPHD – FLM213 Flame for Nuke artists
Info:
This 12-part course, taught by Sam Edwards, is designed to get Nuke compositors up to speed on Flame. Many of the lessons will cover shots created in previous fxphd Nuke courses so that students can refer back to the previous course to compare. The course contrasts Nuke vs Flame workflows and discusses the underlying principals of compositing and how Flame handles them. You’ll be shown tools equivalent tools to those in Nuke, but special attention is paid to the unique tools in Flame.
The class covers three shots. The first is a simple matte painting shot that covers 2D tracking, roto and keying. The second is a much more advanced matte painting shot that covers the creation of the entire 3D environment. The shot tasks include harvesting a 3D tracked camera from a Nuke file, building geometry, applying textures, and creating a matte painting background from a panoramic photo. Lighting and render passes are also discussed.
The third shot uses CG renders, staring with a look at bringing multichannel EXR’s into Flame. The includes a projection of a spherical map onto 3D geometry creating animated textures for the CG. Each shot shows a slightly different technique for creating the best mattes and suppression from the green screen footage.
Edwards started using flame in 1992 when he took delivery of the second Discreet Logic system in New York City. There he worked on TV commercials, music videos, and feature films for eight years. In 2000, Edwards moved to the West Coast where he took a job at Digital Domain, where he was assigned to the Nuke development team as a test compositor and helped write the in house documentation. He has composited in Nuke and Flame on many large VFX films at ILM and other top studios. Today Sam is a VFX Supervisor and occasional compositor on television programs, feature films, and teaches at fxphd.
To follow along with the course, members can install a 30-day trial version of Flame (for OSX), available for free from the Autodesk web site.
course syllabus
CLASS 1
Basic Flame usage for Nuke users. General introduction to flame layout, showing where the controls are. Explain the difference between batch and BFX as well as cover I/O and a bit of color science.
CLASS 2
The course starts with basic matte painting shot of the two girls in the store from NUK309. The class covers color management node presets, a first look inside Action, 2D tracking, contexts vs the viewer node, Defocus, keyframing, Regrain, viewer controls, and the compare buffer.
CLASS 3
The matte painting shot is completed. The class covers more advanced controls of the master keyer, separating the matte from the suppression, and combining different versions of suppression. A core matte is also created with the 3D keyer, and ends by making a light wrap onto our foreground and track marker removal.
CLASS 4
This class includes a review of Iterations and then begins an advanced 3D matte painting shot from NUK309. Class topics include harvesting Nuke assets, how to import camera and locators into flame/action, and setting up a cylinder for background inside action.
CLASS 5
Continuing the advanced 3D matte painting shot. Tasks include laying out railings and ground as well as introducing texturing. Action outputs, and comping with action output passes are also covered.
CLASS 6
Continuing the advanced 3D matte painting shot. This class picks up on lighting and shading, shadows and shininess, and ambient occlusion within Action. Also covers 3D blur, defocus, and a look at using BFX as pre-render.
CLASS 7
Continuing the advanced 3D matte painting shot. The tracked camera is leveraged to create roto in Action, plus a look at 2D tracking of roto for a moving camera shot.
CLASS 8
Continuing the advanced 3D matte painting shot. This class covers Action G-Mask and creating a reflection of the backdrop. We see how 10 bit rendering clamps and how to set your render node to 16 bit. Also, the 3D Keyer is used for a core matte and the Paint node for marker removal.
CLASS 9
Completing the advanced 3D matte painting shot. How to fix up a comp by interactively comparing it to the previous version. How to combine various versions of our key. A look how the keyers work in different color spaces, tightening up the roto, creating a light wrap ,and adding a rack focus.
CLASS 10
Beginning the CG Compositing shot. Color management for plates. Adding CG geometry and projecting a spherical panorama onto it in Action, using a Map Convert to get the textures needed for projection, and a look at precision color matching.
CLASS 11
CG Compositing shot. A look at shot organization and the batch tree using Compass, adding points, and Mux nodes with hidden inputs. Topics also include bringing in multi-channel EXR files, how the flame Comp node handles multiplication, exploring 3D Blur using depth, and linking nodes.
CLASS 12
CG Compositing shot. A last look at gree
12类项目文件包括 MP4
标题: FXPHD – FLM213 火焰为核弹艺术家
信息:
这门由萨姆. 爱德华兹教授的12部分课程, 旨在让核工人加速燃烧。许多课程将包括在以前的 fxphd 核课程中创建的照片, 以便学生可以参考以前的课程进行比较。该课程对比了核武器与火焰的工作流程, 并讨论了合成的基本原理以及火焰如何处理它们。你将被显示为核武器的工具等同工具, 但特别关注的是在火焰的独特工具。
这门课包括三张照片。第一个是一个简单的哑光绘画镜头, 涵盖2D 跟踪, 旋和键控。第二个是一个更先进的哑光绘画拍摄, 涵盖了整个3D 环境的创建。拍摄任务包括从一个核弹文件中采集3D 跟踪摄像头, 建立几何形状, 应用纹理, 以及从全景照片中创建一个无光泽的绘画背景。还讨论了光照和渲染刀路。
第三次拍摄使用 cg 渲染, 凝视着带多声道 EXR 的火焰。其中包括一个球面地图投影到3D 几何创建动画纹理的 cg。每一个镜头显示了一个略有不同的技术, 以创造最佳的罩和抑制从绿色屏幕的镜头。
爱德华兹在1992年开始使用火焰, 当时他在纽约市交付了第二个谨慎的逻辑系统。在那里, 他在电视广告、音乐录影带和故事片上工作了八年。在 2000年, 爱德华兹搬到西海岸, 在那里他从事了数字领域的工作, 在那里他被分配到核武器开发小组作为一个测试组合, 并帮助写在众议院的文件。他在 ilm 和其他顶级工作室的许多大型特效电影中合成了核武器和火焰。今天 sam 是一个特效的主管和偶尔在电视节目, 故事片, 并在 fxphd 教的组合。
为配合课程, 会员可安装30天试用版的火焰 (osx), 可从网站上免费获得。
课程提纲
1班
核武器使用者的基本火焰使用。火焰布局概述, 显示控件的位置。解释批处理和 BFX 的区别以及覆盖 i/o 和颜色科学。
2班
该课程从 NUK309 的两个女孩在商店的基本哑光绘画拍摄开始。该类包括颜色管理节点预设、内部操作的第一个外观、2D 跟踪、上下文与查看器节点、散焦、关键、Regrain、查看器控件和比较缓冲区。
3班
哑光绘画拍摄完成。该类涵盖了主器的更高级控件, 将遮罩与抑制隔离开来, 并将不同版本的抑制相结合。一个核心的遮罩也创建了3D 器, 并结束通过做一个光包装到我们的前景和跟踪标记删除。
4班
此类包括对迭代的审阅, 然后开始从 NUK309 的高级3D 遮罩绘画。类主题包括收割核弹资产, 如何将照相机和定位器导入火焰/动作, 以及为背景动作设置气缸。
5班
继续先进的3D 哑光喷漆拍摄。任务包括铺设栏杆和地面, 以及引入纹理。还包括动作输出, 以及作曲的操作。
6班
继续先进的3D 哑光喷漆拍摄。这个类在照明和阴影, 阴影和光泽, 和环境遮挡行动中回升。也包括3D 模糊, 散焦, 并在使用 BFX 作为呈现。
7班
继续先进的3D 哑光喷漆拍摄。该跟踪相机是利用创建旋的行动, 再加上一看2D 跟踪旋的移动相机拍摄。
8班
继续先进的3D 哑光喷漆拍摄。这个类包括行动 g 面具并且创造背景的反射。我们看到如何10位渲染夹具和如何将渲染节点设置为16位。此外, 3D 器用于核心遮罩和用于标记删除的画图节点。
9班
完成先进的3D 哑光喷漆拍摄。如何通过交互式地将它与以前的版本进行比较来修复它。如何结合不同版本的密钥。看看录入如何在不同的色彩空间工作, 收紧旋, 创建一个光包装, 并添加一个机架焦点。
10班
开始 cg 合成拍摄。板的颜色管理。添加 cg 几何和投影到它在行动中的球面全景, 使用地图转换获得投影所需的纹理, 并期待在精确的颜色匹配。
11班
cg 合成拍摄。使用指南针、添加点和带有隐藏输入的 mux 节点来查看拍摄组织和批处理树。主题还包括引入多通道 EXR 文件、火焰复合节点如何处理乘法、使用深度探测3D 模糊以及链接节点。
12班
cg 合成拍摄。最后一看格力