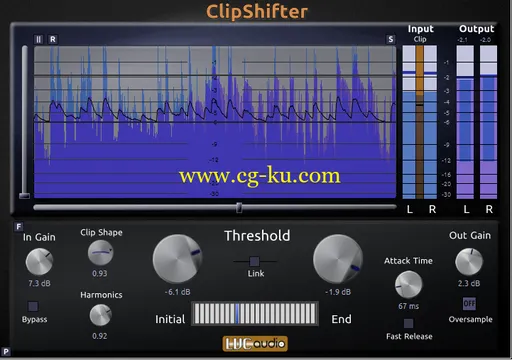
clipshifter是裁剪风格限制器,提供足够的用户控件中的所有的混合阶段是有用的。clipshifter采用独特的阈值控制对输入的音频的瞬态特性的限幅阈值变化动态。的削波失真的声波特性可以改变从硬,砖墙式剪裁,柔软的饱和度与压缩。额外的参数允许用户控制偶数和奇数阶分量的饱和度
LVC-Audio ClipShifter 2 v2.2.0 | 6.2 MB
ClipShifter is a clipping-style limiter that provides enough user controls to be useful in all mixing stages. ClipShifter uses a unique threshold control to change the clipping threshold dynamically based on the transient characteristics of the incoming audio. The sonic characteristics of the clipping distortion can be altered from hard, brickwall-style clipping, to softer saturation with compression. Additional parameters allow the user to control the even- and odd-order components of the saturation.
Oversampling
A problem with many audio plugins is aliasing artifacts. This occurs with certain algorithms that apply non-linear processing to the audio signal. It is especially prevalent at lower sampling rates (e.g., 44100 or 48000). The result is that additional audio content is present at unintended frequencies. This can sound like undesired distortion or harmonic ringing. In general, ClipShifter minimizes aliasing effects through the use of its internal clipping algorithm; however, certain situations can produce unintended audio artifacts.
Oversampling is a process that greatly minimizes alias effects. The general process is to increase the samplerate internally, process the audio, filter out all of the alias artifacts, and then down convert the samplerate. This occurs internally and the audio host application is not aware that any samplerate conversion is occurring.
ClipShifter has settings for 2x, 4x, and 8x oversampling. This means that audio is internally being processed at the samplerate of the track, times the multiple (e.g. 4x of a 44100 sample is up-converted to 176400 samples per second). The result is that most of the aliasing artifacts do not occur once the samples are filtered and returned to the original samplerate before passing to the host application.
Since oversampling involves processing 2, 4, or 8 times the amount of data as well as additional filtering, oversampling can tax the computer’s CPU. Depending on the computer, this may appear as a CPU usage of 2 to 4 times the amount when compared with oversampling disabled.
Clicking the oversample button cycles through the various options (i.e. Off, 2x, 4x, 8x).
Please note: Oversampling involves filtering high frequency content of the audio. Depending on the frequency content of the source and the settings of the multiband frequency control, audible difference can exist between the different settings. This can sound like a slight decrease in the very top end of the audible spectrum (i.e., -3dB above 17kHz).
Multiband Frequency Control
The Multiband Frequency Control is a 3-way variable crossover control that can be used to tailor the sound of ClipShifter. The saturation/clipping processing can be selectively applied to any of the frequency bands. The controls include frequency selectors, gain controls, solo buttons, and a frequency selector control. The settings can be accessed by clicking the button next to the Input Gain control. Clicking the button a second time closes the control, although the current configurations are still applied to the audio.
Frequency Controls:
The top two knobs control the frequency points of the 3-way crossover. The crossover utilizes a LR 4th order filter to split the audio into Low, Mid, and High sections. The default settings for the controls are 20 Hz for the Low control, and 20,000 Hz for the High control. When the controls are set to their default settings, the filters are disabled. As the knobs are changed from their default settings, the frequencies splits are engaged. When the filters are disabled, the corresponding Gain and Solo buttons are hidden. For a 2-band processor, either the Low frequency or High frequency can be disabled. The result is that the audio is split into 2 distinct frequency bands (with the Mid either functioning and the High band when High is disabled, or functioning as the Low band with the Low is disabled).
Gain Controls:
The gain controls change the gain setting of each of the Low, Mid, and High sections prior to processing through the clipping processor. In effect, these controls are input gains for each frequency section.
Solo Buttons:
Clicking a solo button will mute the audio from the other frequency bands. This can be useful in adjusting the appropriate frequency split and/or volume. The waveform display will also change to show the soloed output only.
Frequency Selector:
The Frequency Selector determines what audio is processed through the clipping algorithm, and what audio is passed through to the output without any clipping or saturation. The default setting of for all of the audio signal to be processed through the saturation algorithm. When all three frequency bands are enabled, the selector can be set to process Low, Low + Mid, Mid, Mid + High, High, or All frequency bands. Clicking the Active button cycles through all of the available options. This is dependent on the number of frequency bands currently enabled. When a frequency is not enabled, the audio is still passed through to the output with all of the input, output, and band-specific gain; however, the clipping algorithm will be bypassed for this frequency band.
Please note: the input gain displayed within the waveform history view and input VU meters show the audio that is being processed by the clipping algorithm, even if no clipping is currently occurring. When the Frequency Selector is set to process one or two bands, the displayed input values will show the level of the Frequency Selector bands. This includes any input gain and frequency specific gain.
发布日期: 2013-09-24