File size: 29.8 MBScreen Item Detector is a helpful utility that can scan your desktop at regular intervals and detect the presence of a picture that has been selected beforehand.
It can provide multiple types of notifications and offers several customization options, but it features an outdated UI and lacks documentation.
It is often necessary to monitor content that is displayed on your screen, whether you wish to keep track of other users’ activities or log your own usage habits.
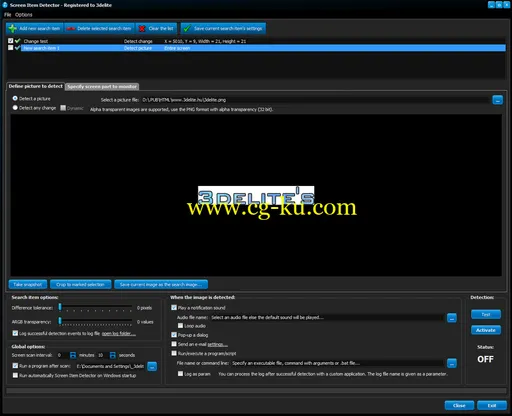
Features:Scan and detect an image that appears on the desktop screenDetect if a screen region changes (detect screen change)Multiple search items are supportedMulti-monitor setups supportedSpecify screen region to monitorSearch images with alpha channel are fully supportedPop-up a dialog, play a notification sound, send an e-mail and/or run an application/script when the picture is detectedBasic steps for using Screen Item Detector:Click on 'Add new search item' and enter a name for it.
Select a picture that you want to get notifications of when appears and is successfully detected.
If there is an existing picture, in the upper-right part of the window click on '.
.
.
', browse and load it.
Screen Item Detector fully supports alpha transparent search pictures too, recommended is the 32 bit PNG format.
If there is no existing picture, open the window with the item displayed that you want to detect, and click on 'Take snapshot' that is below the graphics display.
Scroll the picture into view and with the mouse select the region that should be used as the picture to search for (click and then while holding the mouse button down define a rectangle).
After you have selected the rectangle click on 'Crop to marked selection'.
If the search picture is ok, click on 'Save current image as the search image', a file dialog will pop-up, select a folder and file name for the search picture.
Click on 'Save current search item's settings' to save the settings.
If left to the item's name a green check is shown the item is valid and can be used for scan.
Activate the item with checkmarking it left to the item's name and green check icon (only checkmarked items are scanned).
If you want to limit the search inside a screen region, in the upper-left part of the window switch to the 'Specify screen part to monitor' tab.
Click 'Take snapshot' and select the region where the scan will be performed, then click 'Use selected region when scanning'.
It is advised to select a region as it speeds-up the scan process - the smaller the region is, the faster the scan will be.
To re-set the scan to whole screen click 'Use entire screen when scanning'.
In the lower-right part of the window click 'Test' to check that the scan is working.
Note that if the scan is ok, there will be 2 matches if the Screen Item Detector's window is inside the search region - the search image might be in Screen Item Detector's window too.
In the lower-left part of the window, 'Options', it's possible to adjust 'difference tolerance' (in pixels).
This means if for example set to 10 then the scan will be successful still if there are 10 pixels that are completely different within the search image and the match.
Click on 'Save current search item's settings' again to save the settings if you adjusted 'difference tolerance'.
In the lower-left part of the window, 'Global options', specify how often to scan the screen (minutes and seconds).
In the lower-right part of the window, 'When the image is detected', adjust what to happen on successful detection.
If you wish to send an e-mail also fill out SMTP login info in menu:E-mail/Settings.
.
.
Click on 'Save current search item's settings' again to save the settings if you adjusted 'When the image is detected' options.
If the test is successful activate Screen Item Detector with clicking on 'Activate', if the status shows 'ON', minimize the window with clicking on 'Hide'.
To run Screen Item Detector with Windows startup, in the lower-left part of the window, in 'Global options', click 'Run automatically Screen Item Detector on Windows startup'.
Screen Item Detector will start automatically with Windows, in an activated state every time Windows starts.
Note that clicking on 'Hide' will just hide Screen Item Detector's window, to exit the app.
click on 'Exit'.
When Screen Item Detector is running a tray icon will be displayed, right mouse click on it for a menu.
Checkmarking 'Dynamic' means that if the picture is detected report is performed once, no consecutive detection is reported.
If on the next scan the picture is not found state is re-set.
If the picture appears again on next scan it reported again (once).
Detecting change in screen region:Follow the steps above just this time select 'Detect any change', no need to specify a picture, the rest of the steps are the same.
Checkmarking 'Dynamic' means that if change is detected the new changed region is stored and used for compare next time (on next scan).
Tip: if everything is set up, hide the Screen Item Detector window (clicking on 'Hide') and activate it using the tray icon's pop-up menu.
Note: When scanning for changes the first reference picture is taken when activating Screen Item Detector.
Notes:If 'Pop-up a dialog' is checked, the scanning process is paused until the dialog is closed.
This is to prevent popping-up multiple dialogs if they are not handled in the mean time.
If 'Log successful detections to file' is checked the log will be written to 'C:\Users\{USER NAME}\AppData\Local\3delite\Screen Item Detector\Logs\{ITEM NAME} log.
txt' (Windows 7).
The selected app.
also gets the file name as a parameter if 'Log as param' is checkmarked.
Specifying a scan region is valid only until a screen resolution or display re-order change.
If the display setup changes the scan region needs to be specified again.
To do a manual scan, set up the search items, do not click 'Activate' but just click 'Hide' to minimize the app.
to the tray and press Win + S keys when needed to do a scan.
It will work as it was a timed scan.
Tip:To process the detections with an external app.
/script, set-up 'Run/execute program', enable loging and within the app.
/script open the log file ('C:\Users\{USER NAME}\AppData\Local\3delite\Screen Item Detector\Logs\{ITEM NAME} log.
txt' (Windows 7)), parse the detected parameters, delete the log file, a new one will be created on next successful detection that can be parsed again.
The selected app.
also gets the file name as a parameter if 'Log as param' is checkmarked.
Whats New:Added option to attach a screenshot when sending e-mail.
./www.3delite.hu
发布日期: 2020-09-09